Set Up your project
Along this tutorial, I will assume that you use CMake to set up your project. I will also use GLFW for handling window
Build source inside your project
All you have to do is to copy the Mountain-API directory into your project directory then
add_subdirectory(Mountain-API)
target_link_libraries(<your_target> PRIVATE Mountain::API)
That’s all you have to do to use Mountain=API
Use Mountain-API package
If you download the binary package of Mountain-API, you can use the find_package function.
But first, you will have to use CMAKE_MODULE_PATH to tell CMake where is the package.
set(CMAKE_MODULE_PATH <path_of_the_package> ${CMAKE_MODULE_PATH})
find_package(MountainAPI)
target_link_libraries(<your_target> PRIVATE Mountain::API)
First triangle
Let’s start with the “Hello World” of 3D Graphics, and render a triangle.
Create Window
First we have to create a window to contain our vulkan context
#include "mountain/context.h"
#include <vector>
int main(){
        std::vector<const char*> const devices_extension{
            VK_KHR_SWAPCHAIN_EXTENSION_NAME
    };
    auto constexpr width = 1366;
    auto constexpr height = 768;
    mountain::Window const window("First Triangle", width, height);
    using namespace std::chrono_literals;
    while (!glfwWindowShouldClose(window.get_window())) { //to keep window open
        glfwPollEvents();
        std::this_thread::sleep_for(17ms);
    }
}
Create Vulkan context
Now that we have a window let’s add a vulkan context
#include "mountain/context.h"
#include <vector>
int main(){
    std::vector<const char*> const devices_extension{
            VK_KHR_SWAPCHAIN_EXTENSION_NAME
    };
    auto constexpr width = 1366;
    auto constexpr height = 768;
    mountain::Window const window("First Triangle", width, height);
    mountain::Context const context{window,
                                    devices_extension};
    using namespace std::chrono_literals;
    while (!glfwWindowShouldClose(window.get_window())) {
        glfwPollEvents();
        std::this_thread::sleep_for(17ms);
    }
}
With this little amount of code, we have a window that shown and a vulkan context. Now we should be able to add some Vulkan stuff.
Create Render pass
Since you are a bit familiar with vulkan, if not see this tutorial, you know that we need some stuff to be able to draw our triangle. With Mountain=API, we’ll need a renderpass, a swap chain, a graphics pipeline and command buffers objects. Those four object are part of the Mountain=API and hide a lot a vulkan stuff but you still have some flexibility to choose some options. First we have to create our render pass (for now, Mountain=API only one subpass is supported).
#include "mountain/render_pass.h"
...
vk::SubpassDependency dependency{};
dependency.srcStageMask = vk::PipelineStageFlagBits::eColorAttachmentOutput;
dependency.srcAccessMask = static_cast<vk::AccessFlagBits>(0);
dependency.dstStageMask = vk::PipelineStageFlagBits::eColorAttachmentOutput |vk::PipelineStageFlagBits::eEarlyFragmentTests;
dependency.dstAccessMask = vk::AccessFlagBits::eColorAttachmentWrite |vk::AccessFlagBits::eDepthStencilAttachmentWrite;
mountain::RenderPass const render_pass{
                            context,
                            {mountain::RenderPass::COLOR},
                            {dependency}
    };
using namespace std::chrono_literals;
...
For creating our render pass, we first pass our context. Since Vulkan is an agnostic=API, all of Mountain=API classes will require the context before use.
The second parameter is an array of unsigned flags. 3 flags are available COLOR, DEPTH, STENCIL where we pass which sort of attachment we want. For now we only want COLOR so that’s what we pass. But we can pass DEPTH or STENCIL. The second parameter is an array of vk::SubpassDependency which describe the dependencies between subpass.
Create Swapchain
The second object we need is the swap chain
#include "mountain/swapChain.h"
...
//Renderpass...
mountain::SwapChain const swap_chain{
        context,
        render_pass,
        width,
        height
};
...
There is no big deal with that, the swap chain need the context, the render pass, the width and the height of the image we want to render. Let’s continue with something more interesting.
Create Graphics pipeline
We will now create the Graphics Pipeline. We will talk about vertex and fragment shaders and we will create our first vertex buffer.
Shaders
The Graphics pipeline object need 5 things, the vulkan context, the swap chain, the render pass, an array of mountain::shader and an array of vertex buffers.
Let’s create our two shaders files. Call the vertex shader triangle.vert
Vertex shader
#version 450
#extension GL_ARB_separate_shader_objects : enable
layout(location = 0) in vec2 pos;
layout(location = 1) in vec3 color;

layout(location = 0) out vec3 out_color;
void main() {
    gl_Position = vec4(pos, 0.0, 1.0);
    out_color = color;
}
#version 450 and #extension GL_ARB_separate_shader_objects : enable are mandatory to use vulkan.
We have to in because if we want the same triangle as this tutorial shown we need position and color on each of our vertex. Remember the 0 and 1 we will need that later.
The out declarative is too pass value to the next shader, here, it will be the fragment shader.
Call the fragment shader
Fragment shader
#version 450
#extension GL_ARB_separate_shader_objects : enable

layout(location = 0) out vec4 outColor;
layout(location = 0) in vec3 color;
void main() {
    outColor = vec4(color, 1.0);
}
The in declaration correspond to the out declaration of our vertex shader.A side that, it’s a classic fragment shader.
Ok, now we have glsl file, great…but Vulkan doesn’t deal with glsl file, it deals with SPIR=V. Use glslangValidator.
glslangValidator =V triangle.vert =o trianglevert.spv
glslangValidator =V triangle.frag =o trianglefrag.spv
After that we can create two mountain::shader, one for vertex and one for fragment, we store them in an arrays.
#include <array>
...
// swap chain
std::array shaders {mountain::shader{"trianglevert.spv", vk::ShaderStageFlagBits::eVertex},
                    mountain::shader{"trianglefrag.spv", vk::ShaderStageFlagBits::eFragment}};
The mountain::shader only need two parameters, the path to the spriv file (it’s a std::fileystem::path) and the type of shader we want to create. We use C++17 template type deduction to avoid typing the type and the size of our arrays.
Note: Set your working directory so your program can find your shader at this location.
Vertex buffer
The vertex buffer need a structure too hold the information relative too each vertex. We want a position and a color. We use glm but you can use what you want. The position will be a glm::vec2 and color will be a glm::vec3.
#include <glm/glm.hpp>
struct Vertex{
    glm::vec2 pos; //location 0
    glm::vec3 color; //location 1
};
int main(){
...
You remember when we create the vertex shader, we’ve got too input with too number.
layout(location = 0) in vec2 pos;
layout(location = 1) in vec3 color;
We’ve got pos on location 0 and color on position 1. These number will be automatically deduce from the structure you’ve created. So be sure to declare position before color.
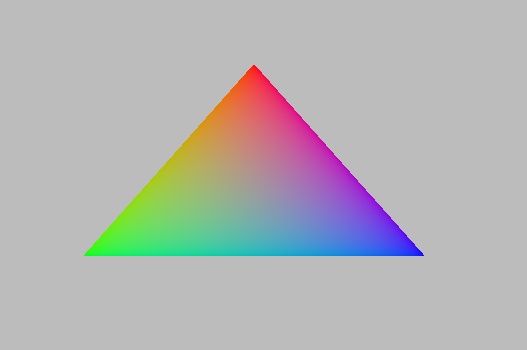
Now create a std::array with 3 vertices. Create also a second std::array that hold std::uint32_t which correspond to the order of vertices to create triangle.
//remember that vulkan's y axis is turn down. 0 is at the top of the screen and 1 at the bottom
std::array constexpr vertices{
        Vertex{{0.f, =0.5f}, {1.0f, 0.f, 0.f}}, // 0
        Vertex{{=0.25f, 0.f}, {0.0f, 1.f, 0.f}},// 1
        Vertex{{0.25f, 0.f}, {0.0f, 0.f, 1.f}} // 2
};
std::array constexpr indices{0u, 1u, 2u};
Great one more thing to do before we can create our graphic pipeline. The vertex buffer it self.
The class for that is mountain::buffer::vertex.
mountain::buffer::vertex vertex_buffer{
                        context,
                        mountain::buffer::vertex_description(
                            0,
                            0,
                            mountain::get_format_offsets(&Vertex::pos, &Vertex::color)),
                        vertices,
                        indices};
There is a lot of thing in here, I will explain all. A mountain::buffer::vertex need 4 things to be create. First, as always, the vulkan context. The third parameter is the array of vertices and the fourth is the array of indices. The second parameter is a mountain::buffer::vertex_description, it contain information about the different attribute inside our Vertex structure. This structure take 3 parameters.
The
bindingparameter is a bit complex but just know that it must be unique by vertex buffer inside a same graphic pipeline.The second parameter is
layout_start_from, it specified which layout we want for our first structure attribute, herepos, we specified0in the shader so we put a0.The last is an array of attribute description, we don’t fill this by hand but instead we use a template class
mountain::get_format_offsets. The arguments are member pointer to the attribute we need. Note : the order of the attribute has no impact for the program.
The Pipeline
At last, we can create our pipeline. For that we need to use the Pipeline Builder.
auto const depth_stencil = [] {
    vk::PipelineDepthStencilStateCreateInfo info{};
    info.depthTestEnable = VK_FALSE;
    info.stencilTestEnable = VK_FALSE;
    return info;
}(); // We have no depth or stencil and render pass so we disable the test
mountain::GraphicsPipeline const back_pipeline = mountain::PipelineBuilder(context)
        .create_color_blend_state()
        .create_mutlisampling()
        .create_rasterizer(vk::PolygonMode::eFill)
        .create_assembly(vk::PrimitiveTopology::eTriangleList)
        .create_viewport_info(swap_chain.get_swap_chain_extent())
        .create_vertex_info(vertex_buffer)
        .create_depth_stencil_state(depth_stencil)
        .define_subpass(mountain::SubPass{&render_pass, 0})
        .create_shaders_info(shaders)
        .create_pipeline_layout({})
        .build();
All of this function are mandatory to create the graphics pipeline.
create_rasterizertake one parameter avk::PolygonModewhich describe how to rasterize trianglecreate_assemblytake avk::PrimitiveTopologywhich describe how to vertices are assemblecreate_viewport_infotake alwaysswap_chain.get_swap_chain_extent()create_vertex_infotake a vertex buffer as inputcreate_depth_stencil_statetake avk::PipelineDepthStencilStateCreateInfowhich describe the depth and the stencil testdefine_subpasstake amountain::Subpassas parameter. A subpass contains a pointer to the renderpass and an index to specify which subpass will be usecreate_shaders_infotake an array ofmountain::shadercreate_pipeline_layoutyou can ignore that for now
Command Buffers
We’re close to display our first triangle. The command buffer is the next object to create. It will tell vulkan how to render what we want. Command buffers in Mountain=API are split into 2 phases. The creation and the initialisation.
Begin with the creation, no big deal with that.
#include "mountain/command_buffer.h"
...
mountain::CommandBuffer command_buffer{
    context, swap_chain, render_pass
};
The initialisation is more interesting. The member-function record take one parameter, a functor that take two parameters mountain::CommandBuffer const& and std::size const. This function will contain the drawing command. Some Vulkan stuff are already handle by the record function like beginRenderPass or all that is related with command buffer handling. In the function that we pass, we handle the drawing things not the clean, or other things.
command_buffer.record([&](mountain::CommandBuffer const& command_buffer, std::size_t const index){
   auto const& command = command_buffer.get_command_buffer(index);
   vk::DeviceSize constexpr size{0};
   command.bindPipeline(vk::PipelineBindPoint::eGraphics, pipeline.get_pipeline());
   command.bindVertexBuffers(0, 1, &buffer.get_buffer(), &size);
   command.bindIndexBuffer(buffer.get_buffer(), buffer.get_indices_offset(), vk::IndexType::eUint32);
   command.drawIndexed(buffer.get_indices_count(), 1, 0, 0, 0);
});
I will only explain the first line because the rest is just basic vulkan stuff. When we create a command buffer object, we create multiple vulkan command buffer, one for each image in the swapchain. The index in parameter is the index of the command buffer we have to use. We retrieve the vulkan command buffer by calling get_command_buffer which return a vk::CommandBuffer const&.
Let’s Draw It
Let’s had the draw command in our main loop. It should looks like this.
while (!glfwWindowShouldClose(context.get_window().get_window())) {
    glfwPollEvents();
    command_buffer.drawFrame({}); // {} empty vector
    std::this_thread::sleep_for(17ms);
}
context=>waitIdle();// wait for the image to be render completely before exiting
The drawFrame function take on parameter, but we don’t talk about this for now so juste pass an empty vector.
That it! Launch your program and you’ll see a beautiful triangle.
Warning: don’t forget to set your working directory so your program can find your spv files.